Be yourself; Everyone else is already taken.
— Oscar Wilde.
This is the first post on my new blog. I’m just getting this new blog going, so stay tuned for more. Subscribe below to get notified when I post new updates.
COM210 Portfolio Washington State University
Be yourself; Everyone else is already taken.
— Oscar Wilde.
This is the first post on my new blog. I’m just getting this new blog going, so stay tuned for more. Subscribe below to get notified when I post new updates.
As Com 210 comes to an end, I realize what a helpful class it was. This class taught me more about creating a business than any class I’ve taken in high school, and I think everyone who’s looking to create a brand one day should definitely consider this course. Each project I did taught me something new, and this will help benefit me in the future for sure. My favorite project was making a brand image since it was something I’ve done before but improved on greatly through this class. Although the other projects were fun, I did find some challenging since I had different versions then the tutorial I was being showed. Through this course I improved my; Photoshop skills, editing skills, creativity, and much more, and this is all helpful to me because I want to start a YouTube channel and create content that revolves around the basic knowledge I learned in this course. As for my career path I want to follow, I’d like to be an advertiser for a company, and help sell products to consumers, so this class has helped by showing how to create an eye catching logo or even by showing me how to make things more appealing digitally. I also found the readings in the blogging best practice to be a good idea to include, because they helped contribute ideas for making a better project. As for skills I wished I learned throughout this course, I think one thing I learned how to do better is the use of Adobe Premier. I say this because the version I had was different than the one in the tutorial, and this made it harder to locate and edit my videos to make them come off as more professional. I liked working with Adobe Premier because I feel as if it was the one Adobe app that is the most useful for what I want to do with my YouTube videos. Besides the tutorial videos on YouTube, other outside sources that helped me complete my projects included a lot of googling on where to find certain things within the adobe apps. Also, during our logo making project, there was the website that had the color wheel and I thought it was super-efficient in creating a smooth professional logo, however I did forget the name. As for some suggestions and changes I would make to future classes, I would prefer an update version of the tutorials, because adobe has changed a lot about their apps, and I did lose points on a couple projects due to me not being able to follow these tutorial correctly. Besides that minor change, I think this was a great class to benefit my knowledge on multimedia production, and I’m happy I took this course.
For my final story post for our unit 4 project, I had to recreate my video since I had technical difficulties with the way the video was shown. After revising my original post, I didn’t have the same workout machines available, so we had to work with what we had at home. This minor bump in the road was a little irritating to deal with, but at least I was able to get in a little extra work with my buddy. I think this video did a great job at showing simple workouts that people can do at home as long as they have some dumbbells and space available to do these workouts. I chose these 3 simple workouts because they’re all different muscle categories. Also, these three workouts don’t require a spotter which is necessary for a lot of the gym workouts we’d want to demonstrate. All in all, these 3 workouts can improve key muscle groups and they’re super easy to follow because the instructions on them are demonstrated and explained in the short video. When going through premier to make these videos, I ran into difficulties trying to add in background music to make the video more appealing, and since the application didn’t allow me to add in the audios of the videos, I just decided to not include them. One thing I found to be important that’s included in my video and not others you’d find on YouTube include the fact that mine get straight to the point rather than taking up time and talking about unnecessary things that the viewers don’t want to see while looking for workouts. While creating the video, I used a variety of different shots to capture all angles on the workout, and I included audio instructions on how to correctly do them. After I finished the project, I was satisfied with how it came out. I think this video would be a great simple workout tutorial, and even though it could be longer, I think I could just create more videos in the future. All in all, I probably took a little extra time then I should’ve doing this assignment due to some of the technical difficulties I had trying to export the film, but it was nice to finally be finished for this week at least.

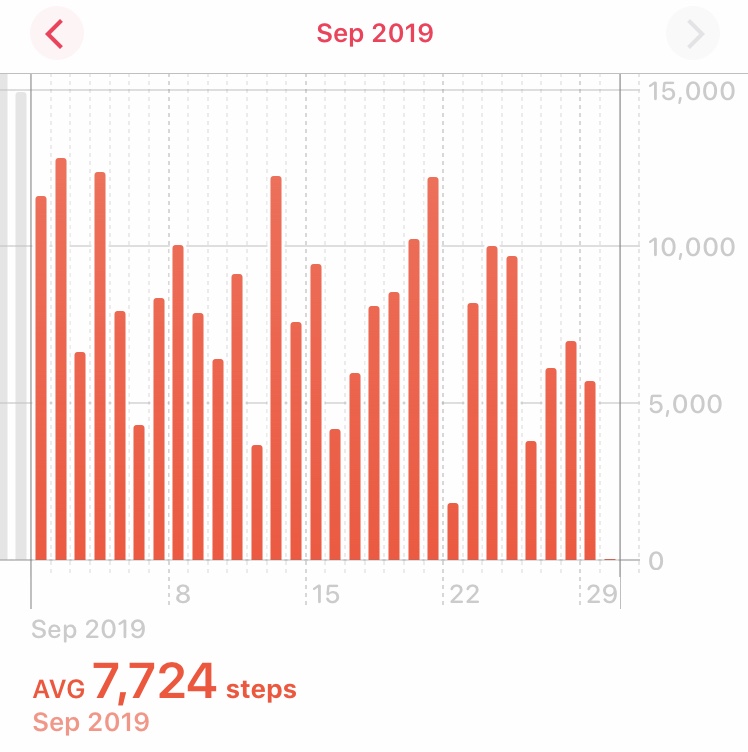
For my project I decided to go with tracking the steps I took over a two-week time period. During this time, I learned a lot about how much a daily walk can help a person relax and just take a minute to enjoy the world around them. One thing in class that is like the walking exercise I’ve been following for the past couple months is the Wednesday medication. Although during the Wednesday medication we aren’t doing a physically activity, it really helps clear my mind and allows me to take a moment to just relax and enjoy the moment, which is exactly what my walking exercise allows me to do.
This project has also been fun to complete, while learning in class how to track our data in the most effective ways, I was able to track all my necessary data. For this project I used Apple’s Health app which is free to use under the terms and conditions that the user allow Apple to track information about the them, personally I didn’t find the information I was giving Apple too important so I just skimmed past the terms and just accepted them. The project examples that were showed in class helped motivate me to make mine different than others, and while we did our peer reviews, I was able to see others project drafts and learn from them. One main thing that helped me complete this project was some of the ideas I got from others in the class. Lots of the people I met with had great feedback to give me, and while using this feedback I was able to create a final product that was a lot more complete than I imagined it would be post draft. It was also nice to help give classmates ideas on how to improve their drafts and add more creativity to their projects.
Apple’s Health app tracks a lot of things, not just your steps, but the idea of calculating each step a person takes for every day is a great idea, but also weird at the same time. Like some of the tracking topics we talked about in class, this app can see what days you’re most active, and if you add an Apple Watch to the equation, it’ll add even more features. Unfortunately, I don’t have an Apple Watch yet, but I do find it somewhat weird the app can calculate the number of steps and stairs climbed to an accurate number (if you have your phone on you and charged). Some articles we talked about in class that tracked data like the target topic, I found weird since I don’t personally like being tracked, but when tracking myself I found it interesting because it just showed me how active I was being on certain days. I also was amused by the difference in everyday moods after longer walks. I found these walks to be beneficial to my mental health, physical health, and even improved my sleeping patterns. These positive improvements help motivate me to keep going on these walks, and they also help me maintain a healthy lifestyle.
In class we talked about how to make an effective and accurate graph that fits our tracked data and organizes it to make it easy for everyone to understand. Some of the graphs I saw were hard to follow and the original one I made was hard to follow as well. After going over good graphs in class I was able to construct a graph that fits my project in the most simple, effective, and accurate way, which I would consider a good graph since it has all of the key elements. Another thing that I made my graph include was a simple color way since it wasn’t too distracting and had a clean design to it. It was easy making the x and y axis since the day we looked at bad graphs I noticed most of them weren’t easy to understand due to the weird values the included. After seeing the bad graphs, I learned exactly what not to do, and concluded that keeping a simple graph was the way to go. Also, the bar graph fits nicely with the type of data I was collecting.
The “CRAP” method we discussed in class, played a big contribution to the way I created my project. Since I knew that not involving the CRAP method within my project would result in a bad grade, I knew I had to follow it strictly. With that said, I thought about which components of the CRAP method were most important to me and I prioritized them first. Contrast being the most important to me, allowed me to create a story with my poster. With the graphs being the biggest items on the poster, and the small font paragraph easy enough to read, small enough to not grasp all the audience’s attention, and lastly the little art I decided to add all came together to form my ideal poster. The repetition of color I decided to follow was a nice black and white, with the accent color being orange, unfortunately when I printed the graphs out they came out more red, and I personally thought the orange looked a lot nicer, but at the same time the red was a good touch to add. When it came to alignment, I knew that my project would be easy to align in order to get my point across, so I added the graph from the 1st week first, and then put the 2nd week right after it. With the title at the top, I added the text explaining my data tracking project right below it in a small font, after that was all together I realized I had a lot of blank space and decided to cut the shape of stairs on my poster board using a knife which wasn’t too easy, but the final product came out ok. Lastly, I had a bunch of blank space and wanted to fill it in with something related to my topic, so I added in the shoe to finish it off. I didn’t think too much about proximity, but since I had the contrast, repetition, and alignment, it was almost like the proximity for all my pieces was perfect the way it way. Without the CRAP method, my project would’ve turned out a lot less organized, and I’m glad I was able to learn and execute this so smoothly on my first try.
For my project I wanted to show how video games have changed overtime, not for the better, and not for the worse, but just changed in general. I chose video games since they’ve always been a part of my life, and they’re also a technology that brings people together which I find fascinating. Since the start of my childhood, I’ve noticed that video games have always been big news when they’re released, or maybe there’s a new system coming out and lots of people want to be the first to get it. This is due to the new content and experiences you can get from newer games. With that being said, it may seem like an argument being made about newer gaming being better/more important than past gaming, but that isn’t true at all. Every year, games do change in large amounts, but a lot of the concepts within the games will stay the same. So, although there may be a new game coming out each year for a certain series, that won’t stop players from going back and experiencing an old memory, which brings me to my next point.
Since gaming has been around for such a long time that almost everyone you’ve met has experienced some sort of gaming experience, it’s something that can bring people together. Older games such as; Mario, Tetris, and Asteroids are games that have been around for sometime, and that doesn’t stop these games from being some of the most popular, cultural changing experiences of all time. Even now, in today’s time, these games are being remade with different graphics and styles of playing, but this still doesn’t take away from the feeling of playing the original versions.
For my piece I created a side by side comparison of what gaming looked like in the past, and how it is at its current stage. Each side of the spectrum ranging from old to new has plenty of fans who have a love for it. Each side also offers unique styles of playing that have changed gaming culture for good, and no side has more love than the other, although games and consoles may be similar, each and every game/console you play offers a unique experience you can’t get with other options. That’s why as time goes on, old games and new games will still be relevant and continue to grow, and they’ll bring the entire gaming community together as one.
Part 1-
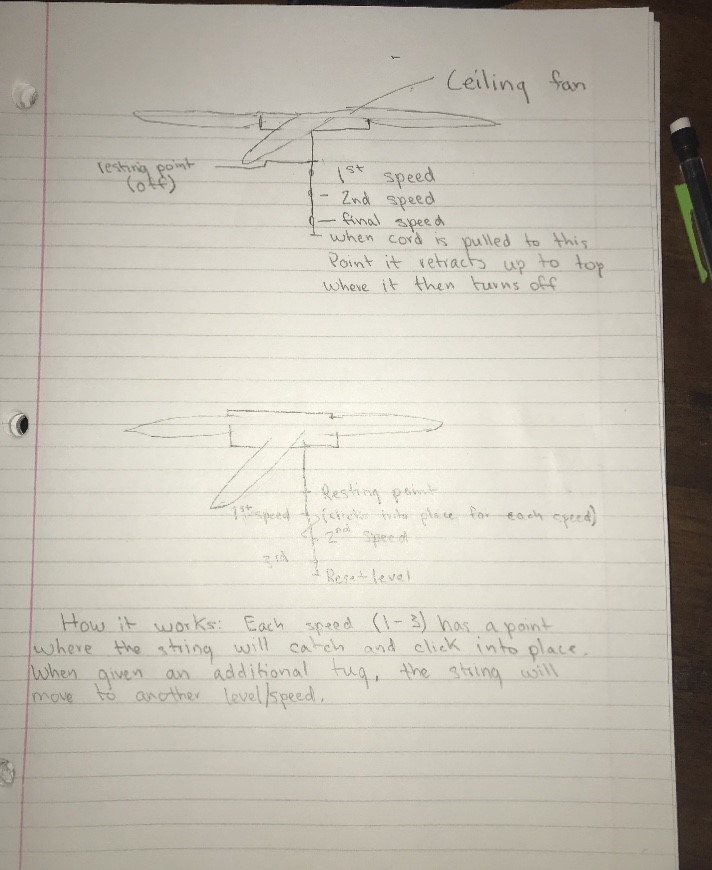
Ceiling fans are one of our best friends in the summertime, providing air circulation throughout our house and rooms. But even these luxury items have faults in them that cause inconveniences. I interviewed several people, friends, family and strangers around WSU on the problems they face with traditional ceiling fans. In every interview all of our participants brought up the inconvenience of not being able to tell what speed the fan is on when pulling the sting. “Everytime I turn my fan on I have to start with it turned off and then listen for the speed I want, ” many of my participants said. This is an inconvenience that is a time waster and prevents you from quickly doing a simple job. This type of problem does not pertain to a specific group of humans, this is a struggle that we have all dealt with one time in our life or another. We first have to understand the frustration of those people and see what material would help them use their fans easier. This is where our team steps in, a traditional ceiling fans controls are too simple of a design that lacks things such as user feedback and convenient features. My group and I have made it our goal to come up with a new tool that redesigns how you use your ceiling fans.
This new design will help eliminate the inconvenience of your unawareness of the fan setting, giving you feedback so you are always certain what speed the fan is spinning. This simple re-design consists of a replacement string that is retractable and has different length settings. For example, when the fan is off our new string is at its highest point, when pulled once it goes down one level then stops, second pull puts it at the second level, and the third to the third level. This adds the feature of user feedback, each different length of the string has a color on it to also indicating the level.
Part 2-
After doing some research, we thought about the product that needed changing in our everyday lives, and while we were brainstorming, the idea of ceiling fan strings came across our minds. Since we already interviewed people and found out the main problem with them, we had to go back and now create a solution. These ceiling fans can be tricky to tell if you’re turning them off, or if you’re turning up the power on them more. With that said, we created a string design that can be attached to a fan making it simpler to tell which level of power you’re at, and when you’ve officially turned it off. During our first design, the product was a little rough. We didn’t have a solid idea on how to create a product that wasn’t already out yet, and with ceiling fans there are many different types. While we brainstormed an idea on how to make a ceiling fan easier to understand, we had the idea of having a retractable string that would click on 3 different speed settings. This original design didn’t have an indicator of whether or not the different speed has been achieved, so we had to go back and add more to our design making it the most user friendly and easy to understand product out there.
Since our first idea didn’t fully make the product as simple as we wished, we knew the idea wouldn’t be complete without another signifier. So, we went back, polished our idea up, and created the final product of having a string that had 3 different speed settings, with a clicking sound that indicates each speed you’re fan is at. Then once you’ve cycled through all 3 speeds, the string will then go back up and restart at its point of origin. After we brainstormed this idea, we knew there wasn’t much more we could change that would make the product any more simple, and that’s how we knew that our designed prototype was the perfect fit.
Part 3- As we looked back at our final design, we were all satisfied with the outcome, as well as some of the people we interviewed afterwards asking them if they liked the idea or not. The simple string added to the ceiling fan created a huge difference in their eyes, and that’s what our final goal was. With this addition to ceiling fans, we hope to eliminate the confussion for those wondering what speed/power their fans are on for good. Personally, we believe that this addition will impact culture by taking away the amount of time it takes to figure a simple task of getting the right speed on the fan. We understand the general emphasis on high-tech. But as Victor (2011) put it in the article “A Brief Rant on the Future of Interaction Design”, on top of the technology, we can always add something dynamic to the target object, so that users can “feel and manipulate” the upgraded medium. We find that there are certain apps used in companion with the set of devices for “smart home” that enable users to control the indoor temperature or precisely the speed of fans. However, we think that the whole experience can be more tangible and the purpose of controlling the speed can be transmitted in a more elegant, simpler way. With a clicking sound, our design can let the users feel in control. Apps may be convenient and in trend, but a string is more straightforward, which is more easy to understand after learning more through the article “The Design of Everyday Things” where “visual metaphor” play key rolls in showing objects can be easier to use.
For my draft video footage, I wanted to give the viewers an idea on how to do some basic workouts in the gym. Although I could’ve added more workouts to the video, I wanted to show some important key workouts that’ll help gain strength quickly. This video relates back to my topic since it’s a video on how to do basic workouts in the gym in increase strength and maintain a healthy lifestyle. Some design influences that helped me make this video included my friend who use to be a personal trainer at the gym in my hometown, and also some workout videos you can find online. However, a lot of the videos I found online, the person exercising would often just get straight into the workout without explaining much, so I wanted to be more helpful to the viewers and create a video where I was teaching rather than just showing the viewers how to do the workouts. I think creating a video where I’m showing the viewers how to do them is a lot more significant since the viewer can actually gain an understanding on how to do it correctly, which is very important when you’re working out since if you do it wrong you can permanently damage certain muscles. While creating the video, I used a variety of different shots to capture all angles on the workout, and I included audio instructions on how to correctly do them. I gathered this video by going to the gym and just recording it with my friend Andrew, then I had to put it together using Adobe. Using Adobe Premiere Pro wasn’t too fun for me since I had a difficult time finding out how to add in text and transitions, also the software was giving me a difficult time trying to import all of the clips, and an even more difficult time trying to export them and post them on YouTube. All in all I probably took a little extra time then I should’ve doing this assignment due to some of the technical difficulties I had trying to export the film, but it was nice to finally be finished for this week at least.
Sample Storyboard: Blake’s workout guide
| Visual Elements | Audio Elements |
| 0:00-0:35 Simple workout called “dumbbell squat” where you take a dumbbell and simply do squats with it | Give advice on weights to chose and how to position yourself to do the workout correctly |
| 0:35-1:12 Flatbench dumbbell press, pinch shoulder blades and do a total of 3 sets of x amount of reps. Keep core flexed and bring arms to 90 degrees | Give a run through on how to properly do flat bench dumbbell press and keep good poster while doing it |
| 1:12-1:55 Legpress/Leg extension workout. Make the seat proper length as well as the mechanics on the machine, the extend legs fully then retract and repeat | Give a example on how to properly do leg press, and adjust the seat and mechanics to your liking. |
|
|
|
|
|
|
|
|
|
|
|
|
Sample Storyboard: Blake’s workout guide
| Visual Elements | Audio Elements |
| 0:00-0:35 Simple workout called “dumbbell squat” where you take a dumbbell and simply do squats with it | Give advice on weights to chose and how to position yourself to do the workout correctly |
| 0:35-1:12 Flatbench dumbbell press, pinch shoulder blades and do a total of 3 sets of x amount of reps. Keep core flexed and bring arms to 90 degrees | Give a run through on how to properly do flat bench dumbbell press and keep good poster while doing it |
| 1:12-1:55 Legpress/Leg extension workout. Make the seat proper length as well as the mechanics on the machine, the extend legs fully then retract and repeat | Give a example on how to properly do leg press, and adjust the seat and mechanics to your liking. |
|
|
|
|
|
|
|
|
|
For my final audio story, I completely smoothed out my interview with my friend Avery, and since I thought it was such a strong interview, I kept the whole original story of it. I truly think what was said in the interview is great motivation to get those to understand my topic, and maybe try and follow the ways of living that I’m talking about in my interview. Some of the feedback I received was to get rid of all of the “uh’s” and other words relating, and that’s exactly what I did. I went back through and adjusted my interviews clips in order to eliminate all help words, and this made my interview sound a lot better. Other comments I got on my original draft included not having too long of pauses, so I cut the pauses out to make my interview flow as steady as possible. With all of this done, my final audio is now smoother and sounds a lot more professional than my original draft. Given that my topic is all about going to the gym, I think having the interview with my mentor was very important since the same guy I’m interviewing is also the same guy who motivated me. So creating an interview with him was the best idea I could think of as for getting people motivated to go to the gym. I could’ve created audios of me telling people how to do certain workouts, but I feel like those wouldn’t be useful if I couldn’t motivate anyone to go to the gym in the first place. Creating this interview was simple since I just thought about the things, I’d like to hear being a first-time gym user, or maybe a person who’s never gone to the gym before. Also, everything I added in my interview was a genuine response and we only needed to have one take at creating it (despite all of the pauses and “uh’s” that I later edited out). Overall, I think this audio is a great piece to inspire people to get out of their comfort zone in order to improve their lives with the gym.
For this project I created an interview with my mentor Avery, who is the person who originally got me in the gym. I figured this would be a great idea given that my topic is all about getting motivated to go to the gym and follow a healthier lifestyle. The reason for choosing an interview was because I feel that it does a great job going over some of the things I wish I knew, also it goes over some of the reason why I still go, so with that given information I feel that this is the best way to get my audience interested in my topic. My design influence for this audio was practically like most interviews, but I had background knowledge for a beginner in the gym, so I feel like that helped a lot with some of the things we discussed. The significance of my design is simple, since I’m a beginner in the gym, I tried to think about all of the stuff I’d like my audience (who I presume are mostly beginners) to know, and I worked around that. Creating this interview was fairly easy considering that both Avery and I have been going to the gym for some time now, and Avery is great at helping people understand things in an easier perspective. I knew the questions I had to ask prior since I did some brainstorming based off of important key points, and we ended up finishing the interview in one take given that I had to edit out some parts. Using adobe to edit my project was pretty fun, I think since I’ve messed with similar apps prior to this one, I wasn’t too bad at constructing it at a efficient speed, and that was nice since the other adobe apps weren’t as easy for me. Some technical difficulty I encountered was problems with the clips length, which I later figured out that adjusting the audio by dragging just added it back.
For my story I want to tell, I would like to give the listeners a little motivation in order to get inside the gym for the first time or a returning time.
